Table of Contents
Your project works. It lives in a folder on your laptop, and that folder is the only copy in the world. One spilled cup of tea and it is gone, along with every evening you put into it.
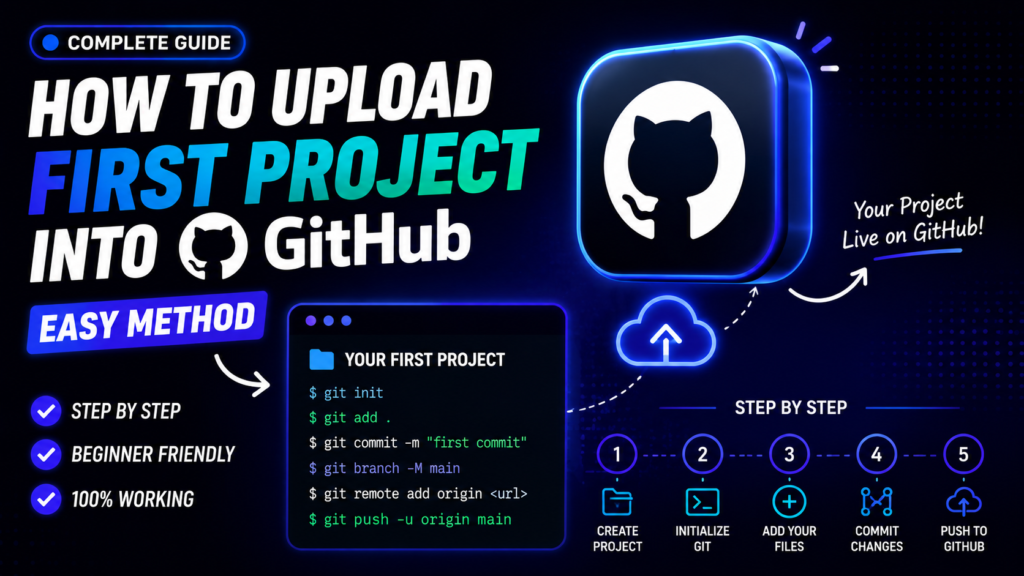
Putting it on GitHub takes about five minutes and fixes that permanently. It also gives you a link to send to a client or an employer, which is worth more than any certificate. This guide covers the exact commands, the authentication step that stops most beginners, and what to do when the errors appear.
Before you start you need:
✓ A GitHub account, free
✓ Git installed on your computer. Check with git --version
✓ A project folder that already exists
✓ About five minutes
What You Are Actually Doing
Four places, three commands. Once this picture makes sense, Git stops feeling random.
1Create the Repository on GitHub
Sign in to GitHub, click the + in the top right and choose New repository.
An illustration of the new-repository page. Keep this tab open; you need the URL in step 5.
Public or private? Public is right for portfolio projects you want employers and clients to see. Private is right for client work and anything with business logic you cannot share. You can switch either way later in Settings.
2Tell Git Who You Are
Skip this and your commits are credited to nobody, or to the wrong account. It is a one-time setup on each computer.
git config --global user.name "Your Name"
git config --global user.email "you@example.com"

# Check it worked
git config --global --list
Use the same email address as your GitHub account. If it does not match, your commits will appear on GitHub without your profile picture and will not count toward your contribution graph. If you would rather not publish your real address, GitHub can give you a private @users.noreply.github.com one in Settings → Emails.
3Create Your .gitignore First
This step comes before git add for a reason. Once a file is committed, removing it later does not remove it from the history. Get this right the first time.
Create a file called .gitignore in your project root, with the dot at the front and no other extension.
# Dependencies: anyone can reinstall these
/vendor
/node_modules

# Secrets: never, ever commit these
.env
.env.backup
.env.production

# Build output and caches
/public/build
/public/hot
/public/storage
/storage/*.key
/storage/framework/cache/*
/storage/logs/*

# Editor and system junk
.DS_Store
Thumbs.db
/.idea
/.vscode
*.log
node_modules/
dist/
build/
.env
.env.local
*.log
.DS_Store
.vscode/
coverage/
Why this matters more than any other step. The .env file holds your database password and API keys. Push it once to a public repository and automated bots will find it within minutes; people scan GitHub for exactly this. If it happens, deleting the file is not enough, because the history keeps it. You must change every password and key it contained, immediately.
4Initialise Git and Make the First Commit
Open your terminal inside the project folder. In VS Code, Terminal → New Terminal does this automatically.
# 1. Turn the folder into a Git repository
git init -b main

# 2. See what Git is about to include. Always look at this.
git status

# 3. Stage everything that is not ignored
git add .

# 4. Save the snapshot
git commit -m "Initial project"
$ git status
On branch main

No commits yet

Untracked files:
  (use "git add <file>..." to include in what will be committed)
        app/
        public/
        resources/
        composer.json

# Notice what is NOT listed: vendor, node_modules and .env.
# That means .gitignore is doing its job.

$ git commit -m "Initial project"
[main (root-commit) a1b2c3d] Initial project
 187 files changed, 9421 insertions(+)
Read that git status output before committing. If you see vendor/, node_modules/ or .env in the list, stop. Your .gitignore is in the wrong place or misspelled. Fix it before you commit, not after.
5Sort Out Authentication
This is the step the original guide, and most guides, skip. It is where beginners actually get stuck, because GitHub no longer accepts your account password from the command line.
remote: Support for password authentication was removed.
remote: Please see https://docs.github.com/get-started/getting-started-with-git
fatal: Authentication failed for 'https://github.com/you/project.git/'
You have two ways to fix it. Pick one.
# 1. Create the key (press Enter at every prompt to accept defaults)
ssh-keygen -t ed25519 -C "you@example.com"

# 2. Print the PUBLIC key and copy the whole line
cat ~/.ssh/id_ed25519.pub        # macOS / Linux / Git Bash
type %USERPROFILE%\.ssh\id_ed25519.pub   # Windows CMD

# 3. Paste it at github.com/settings/keys -> New SSH key

# 4. Test it
ssh -T git@github.com
$ ssh -T git@github.com
Hi your-username! You've successfully authenticated,
but GitHub does not provide shell access.
That message is success, despite how it sounds. You are ready to push.
The file ending in .pub is the one you share. The other file, with no extension, is your private key. Never paste it anywhere, never commit it, never send it to anyone, no matter who asks.
6Connect and Push
Fill in your details and the exact commands for your project appear below, ready to copy.
$ git push -u origin main
Enumerating objects: 214, done.
Counting objects: 100% (214/214), done.
Compressing objects: 100% (198/198), done.
Writing objects: 100% (214/214), 1.42 MiB | 980.00 KiB/s, done.
To https://github.com/your-username/laravel-docker-project.git
 * [new branch]      main -> main
branch 'main' set up to track 'origin/main'.
What -u does: it links your local main to the one on GitHub, so from now on you can type just git push with nothing after it. You only need the long version once.
7Check It Worked
Refresh your GitHub repository page. Your files should be there, and the things you ignored should not be.
📁 public Initial project
📁 resources Initial project
📄 .gitignore Initial project
📄 composer.json Initial project
An illustration of the uploaded repository. Click into .gitignore on GitHub to confirm it is the file you intended.
From Now On: Three Commands
The hard part is over and never has to be repeated for this project. Your daily routine is this:
git add .
git commit -m "Describe what you changed"
git push
| Command | What it does |
|---|---|
git status | What has changed and what is staged. Run it constantly. |
git add . | Stage everything that is not ignored. |
git add file.js | Stage one file only, when you want a tidy commit. |
git commit -m "..." | Save the staged changes with a message. |
git push | Send your commits to GitHub. |
git pull | Bring down changes made elsewhere, such as edits on GitHub itself. |
git log --oneline | See your history, one line per commit. |
When It Goes Wrong
These are the errors you will actually hit, with the exact text so you can search this page for yours.
Support for password authentication was removed
Your GitHub password does not work for Git any more. Use a personal access token in place of the password, or set up an SSH key. Both are covered in step 5 above.
remote origin already exists
You ran git remote add origin twice. Either remove it with git remote remove origin and add it again, or just point it somewhere new: git remote set-url origin YOUR_URL. Check it with git remote -v.
failed to push some refs · Updates were rejected
GitHub has commits your computer does not, almost always because you ticked “Add a README” when creating the repository. Fix it with git pull --rebase origin main and then push again.
src refspec main does not match any
You are pushing a branch that does not exist yet, usually because you have not committed anything. Run git status. If it says “No commits yet”, do git add . and git commit -m "Initial project" first. If your branch is called master, rename it with git branch -M main.
I committed my .env file by mistake
Act in this order. First, change every password and key that file contained, because it has already been exposed. Then clean it up:
echo ".env" >> .gitignore
git rm --cached .env          # stop tracking it, keep your copy
git commit -m "Remove .env from version control"
git push
Note that this removes it going forward but the old commit still contains it. For a public repository, rotating those credentials is not optional.
This file is larger than 100 MB
GitHub refuses files over 100 MB. Usually it is a video, a database dump or a build folder that should have been ignored. Add it to .gitignore, then git rm --cached thebigfile, commit and push. For files that genuinely must be versioned, look at Git LFS.
fatal: not a git repository
Your terminal is not inside the project folder, or you have not run git init yet. Check where you are with pwd on macOS and Linux, or cd on Windows.
Common Questions
Can I upload files by dragging them into GitHub instead?
Yes, GitHub has an upload button, and for a single file it is fine. For a project it is a bad habit: you get no history, no record of why anything changed, and you have to repeat it manually every time. Learning these six commands once is less work than uploading twice.
Should my repository be public or private?
Public for anything you want to show employers or clients. Private for client work, unfinished experiments, or anything containing business logic. Both are free, and you can switch later.
What is the difference between Git and GitHub?
Git is the program on your computer that tracks changes. GitHub is a website that stores Git repositories online. Git works perfectly well without GitHub; GitHub is how you back it up and share it. We cover this in What do you mean by Git?
How do I add a README so my project looks professional?
Create a file called README.md in your project root. GitHub displays it automatically on the repository page. Say what the project does, how to run it locally, and include a screenshot. For a portfolio project this is the most-read file you will write.
Do I need to do all of this again for my next project?
No. Steps 2 and 5, your identity and authentication, are set once per computer. For every future project it is just git init, .gitignore, commit, add the remote, push.
The Full Video Tutorial
Here is the whole process on video, if you prefer to follow along:
New Git, Laravel, Docker and Linux tutorials every week.
Read next: Understanding Web Version Control explains branches and merges with an interactive commit tree, which is the natural next step once your project is on GitHub.
Final Thoughts
Six commands, and your project is backed up, versioned and shareable forever. The two that matter most are not the glamorous ones: write your .gitignore before your first commit, and sort out your token or SSH key once. Everything else is add, commit, push.
Go and upload one project tonight, even an unfinished one. Then paste the link in the comments so I can take a look. I read every one.
If this helped, share it with someone whose only backup is a folder called “final final v2”.